Pages

Wednesday, October 18, 2023

SPOOKY Halloween Coffee Gift Card with My Creative Time

 I had so much fun creating this haunting & spooky

coffee gift card holder.  Literally it took less than 20 minutes to put this

together and it is so cute!


I did make this die into a full card.  See below


By simply aligning the top of the card with a FOLDED piece of paper, make sure
the cut line of the die is just above the fold. When it comes out of the die cut machine you 
will have a top folding card.

MCT Products used:

This will fit into an A2 size envelope so it's not a tiny little card.
Using the Ginger Halloween paper on top of Kraft colored cardstock just
screams FALL.  I did use Tea Dye Distress ink to ink the edges of ALL the
papers.  I was beyond excited to use the Spooky Tag Dies as I just love
them all!  The two bats came from this set as well as the coffin.
Once I pulled out Happy Haunting and found the sentiment "Coffin Break", I was over
the moon!  How perfect for this themed coffee gift!

If you are new to Emma's designs, please note how crisp her stamps are!
The mix of fonts on one sentiment is amazing and truly sets your projects
apart from all the rest.  The ease of mixing and matching throughout her entire
line is what keeps me coming back for more!

Here is the link to her shop where you will find ALL of her creations:

Tell her Cathy sent you!

Thank you for taking time to visit my blog today.
I feel blessed that you have taken a couple of minutes to share
in my crafty hobby!

Cathy

Tuesday, October 10, 2023

Tuesday Tags with My Creative Time!

 I often speak of the versatility of Emma's products and today 

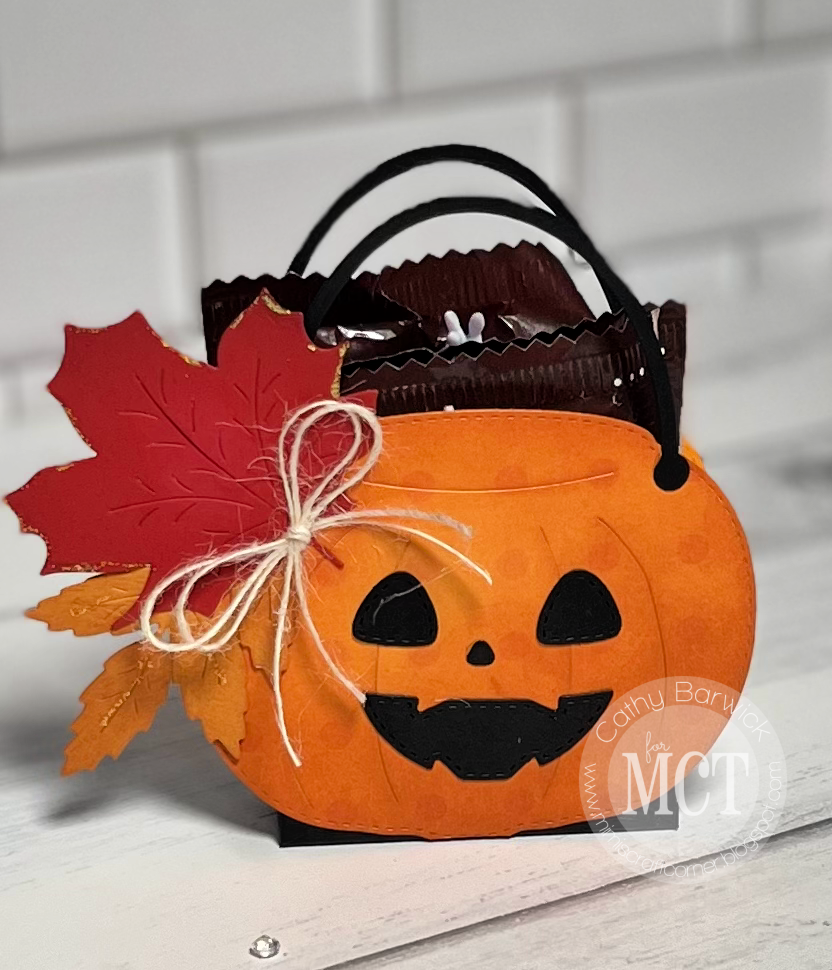
I took a tag die and turned it into a pumpkin box filled with Halloween treats.

Emma makes it easy with her mix and match stamps & dies.


This was such an easy project to put together!
If you have "special" trick or treaters that like to give something extra
to, these would reproduce very easily.

Products used:

I added some Stickles to the tips of the leaves as well as some shading

with Distress Ink.  I actually distressed the pumpkin edges as well to make it

a more two toned color.  For the final touch I added a small bow at the stamp 

of the leaves.  I love it!

Thank you for stopping!  All products have links attached and will

take you directly to Emma's page if you just click on the name of the product.

Have a boootiful month!

Cathy

Friday, September 29, 2023

137 Release for MCT!

 Welcome back crafty friends!

First off, let me share quickly where I've been for the majority of the summer.  My husband who turns 91 today, had two falls in mid May and consequently landed in the hospital to recuperate as he also had a horrible case of the shingles.  He spent several days in the hospital and then a rehab facility and is now home with me who is his primary caregiver.  I'm a nurse and should be able to handle this, but it's been a challenge and I needed to lighten my load of responsibilities which included my time on Emma's Design Team.  I emailed Emma and shared that I felt I was ready to return to my projects and she has graciously welcomed me back. I'm so excited to share a couple of projects for this Blog Hop!

One of the reason I chose MCT products years ago when Emma started her business, was that they all seemed to work together seamlessly.  I never felt that if I ordered a release that I wouldn't be able to go back to my existing products and use them as well to create.  Today you will see me reach back in time and show you the versatility of MCT products!

While I was away Emma switched to the 6 x 8.5 paper pads!  I LOVE THEM!

Die cutting is so much easier!

So here is where I go back and use some of past MCT products with today's release.

Let't talk Etched Edge Z Card!  Isn't this lovely???  The new December 25th Die fits perfectly on the front of this card.  I'm able to use the traditional red/green colors of Christmas to make this project pop.

The large Bow on the front comes from Giant Girl Ginger & Accessories.


But when you open it up, you find that I have added the insert from our new 
Cute Card Pocket Sentiments & Dies.

It's the perfect fit to add in a gift card and you can still decorate.  Love
the little Coffee Cup from the Giant Girl Accessory set.
The sentiment comes from Merry Mail and I still have room to write a little.
Love this card!

Now on to my 2nd project for the Hop.  I'm a huge fan of last years Fun Christmas paper pad
and once again you will find the colors and styles blend beautifully into what Emma
is offering us today~

I used the You've Got Mail Die set but I left off the lid.
It's the perfect holder for gift tags and since the 2022 paper pad had gift tags in it, all
I had to do was use the Scallop Tag Dies and the Wavy & Regular Tag Dies to create the
quickest 9 gift tags ever!  I add my colored seam binding at the top for a bit of color.


What a beautiful gift to that special person who has everything! Everyone gets down to crunch time and needs gift tags and these take cuteness to a whole new level!
 To top off the box I used some beads from
my stash and the Christmas Charms set for the snowflake.

Here is the link for the new 137 release!

***SALE ALERT***

Our sale starts now, Friday, September 29, 2023 @8am PST & will end on Sunday, October 1, 2023 @ midnight PST. Use the code: SEPT2023 at checkout to get 15% off your entire purchase.

Have fun shopping!  Thank you for your sweet welcome back!

Cathy


Thursday, September 28, 2023

137th Edition MCT Release - the fun start 9/29

 May be a doodle of quilt and text

Friday, June 30, 2023

My Creative Time 134th Release is now live!

What a great week of summertime projects!

I know you enjoyed the time spent with our team and now it's your turn to get crafty!

***SALE ALERT***

Our sale starts now, Friday June 30, 2023 @8am PST & will end on Sunday, July 2, 2023 @ midnight PST. Use the code: JUNE2023 at checkout to get 15% off your entire purchase. 


Blog Hop!

You arrived to my blog from sweet Emma, now head over to 

Emily Ann https://creationsofanarmywife.blogspot.com/


As I worked all week cutting out these cute bees, I just knew I needed to use them.
Talk about adorable!  I absolutely love them.
I cut out the 2 layer wings using vellum and then again put some Stickles on the smaller wings to make them stand out. I'm not sure how well the camera picked it up but in person it is so cute.

Happy Shopping!

Cathy